
Introduction
Installing brick slips is an increasing interior design trend, used for creating a stylish real brick feature wall in both commercial and domestic applications. With brick types ranging from sleek glazed brick slips to charming rustic reclaims, there's a finish for everyone to create their perfect mood or setting.
Installing brick slips needn't be a daunting task either, even to the lesser skilled DIYer. Just follow our simple guide to get you on your way:
Calculate the Quantity of Brick Slips
Make sure you don't buy more brick slips than you need, but do allow for some wastage.
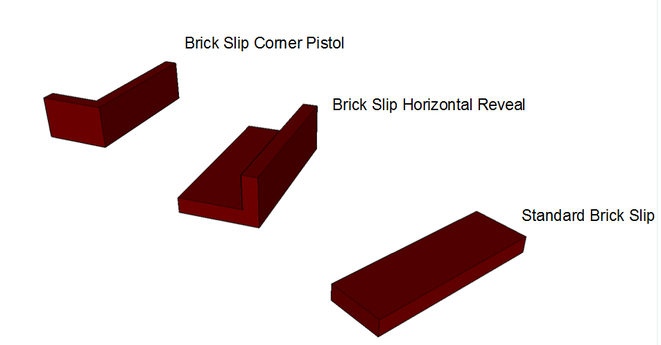
For standard (flat) brick slips, measure out your working area using a tape measure to determine the amount required. There are 60 standard brick slips per m2 based on a standard brick size of 215mm x 65mm.
Working area (m2) x 60 = Brick Slips
If you're cladding around an external corner such as on a chimney breast or an exterior corner of a property, you'll need to incorporate right angled brick slip corner pistols. There are typically 14 corner pistols per linear metre based on a standard brick size of 215mm x 65mm.
Working length (linear m) x 14 = Brick Slip Corner Pistols
Multiply both of the above quantities by 1.1 to allow for wastage.
Preparation
Assemble the following key items to assist your installation:
- Brick Slips and Brick Slip Corner Pistols
- String line
- Spirit level
- Wooden batten
- PVA
- Mixing bucket (reuse for PVA, fixing adhesive and mortar)
- Fixing adhesive (Benerflex Rapido Grey recommended)
- 10mm "T" spacers
- Pointing mortar (Kingfisher recommended)
- Notched trowel
- Pointing trowel, mortar pointing gun or mortar pointing piping bag
- Brick jointer
- Brush
- Floor covers
Cover the foot of the wall with appropriate floor covers and wipe down the area to be clad with a clean damp rag to remove any dust or debris.
Brush or sponge in some diluted PVA (mixed per manufacturers recommendation) solution to prime the wall. Allow to dry.
Visit our Brick Slips Store for any items required.
Applying Brick Slips
Always start applying brick slips from the bottom and work upwards. If cladding an external corner such as a chimney breast, always start by applying the corner pistols first, thereafter work your way inwards with the standard brick slips.
Mix the tile adhesive per manufacturers recommendation and apply to a small area (less than approx 0.5m2, until you get the hang of it). It's important not to spread too much initially as the adhesive may start to dry out before the brick slips are adhered. Once you get into it you'll soon familiarise yourself with the amount which best suits you. Flatten out the adhesive using the teeth of the notched trowel making sure to retain any removed adhesive for future use.
Press the brick slip gently into the adhesive on the wall, continuing their application along the first row. It's typical for a 10mm gap to be maintained between each brick slip for provision of the mortar joint. Use the 10mm "T" spacers to help maintain the gap around each brick until the adhesive is set.
Once the first row is complete, check each brick slip is flush with each other and looks level. Use a string line and spirit level to assist in the horizontal leveling. Use a wooden batten to simultaneously apply a light pressure on the brick slips and help ensure a consistently even surface.
Repeat the process course by course until the wall covering is complete making sure you alternate the corner pistol lengths on each course.
Allow the fixing adhesive to dry out as per manufacturers recommendation.
Applying Mortar
Ensure all 10 "T" spacers are removed prior to the application of mortar.
IMPORTANT: If attempting to apply mortar into the joints using a piping bag or gun, always select a mortar suitable for this purpose to avoid clogging within the piping equipment.
Mix the mortar in the bucket to the manufacturers recommendation. Apply the mortar within the joints ensuring any gaps are filled. It's is recommended to use a piping bag or gun if inexperienced with pointing. Avoid getting mortar onto the brick face if at all possible as it can be difficult to clean afterwards. It's recommended to apply mortar to a small test area or area mostly out of sight, to familiarise yourself with the piping process.
Once mortar pointing is complete allow to dry for between 30 to 60 mins, depending on the consistency of the mortar.
Mortar Striking
After the 30 to 60 minutes of drying, use the curved end of the brick jointer to strike out a depression in the mortar. Ensure to go over all the horizontal and vertical joints of mortar.
Once complete, lightly brush over the brick joints to remove any loose mortar and leave for 24 hours for the mortar to completely dry out.
Use 401 Brick and Patio Cleaner solution (per manufacturers recommendations) to remove any unwanted mortar from the brick face.
Sit back and enjoy your creation!